Bipod rail installation (Atlas bipod adapter)

ATLAS BT17 4" 1903 rail

Bipods have come along way in the past few years.  Some of the newer, sturdier designs like the Atlas and Sierra 7 require a Picatinny (1913) rail to mount them to your rifle.  If you are shooting an AR-15/M16 style rifle with a rail system, this isn’t much of an issue.  However, if you are shooting a bolt action rifle with a traditional stock, you’ll need a rail if you want the fancy bipod.

The Atlas bipod shown here requires a 1913 rail in order for it to be attached to a rifle.

Accu-shot makes two different Atlas bipod rails, the BT15 and the BT17.  Both of these rails are modular, accommodating different spacing of pre-installed QD studs.  The BT is 3.35″ long and accommodates hole patterns with 1.76″ to 2.78″ center-to-center spacing.  The BT17 is 4.00″ long and accommodates hole patterns with 2.20″ to 3.5″ center-to-center spacing.

ATLAS BT17 4" 1903 rail
ATLAS BT17 4″ 1903 rail

Many rifles come with two QD studs on their fore-ends.  If your rifle is always equipped with two QD on the fore-end, simply select the appropriate rail for your spacing, unscrew the studs and screw the rail into place.

If a stock is equipped with two QD studs on the fore-end installation is easy.
Simply remove the studs, put the rail on the stock and screw them back in.  I would suggest replacing the studs with 10/32 screws so they do not interfere with the bipod.
Simply remove the studs, put the rail on the stock and screw them back in. I would suggest replacing the studs with 10/32 screws so they do not interfere with the bipod.

If you only have one QD stud (or no studs), as is the case with the McMillan A5 stock shown below, you’ll need to install a t-nut.

The contents of Rifleshooter.com are produced for informational purposes only and should be performed by competent gunsmiths only. Rifleshooter.com and its authors, do not assume any responsibility, directly or indirectly for the safety of the readers attempting to follow any instructions or perform any of the tasks shown, or the use or misuse of any information contained herein, on this website.

I ordered the BT17 shown here from Brownells.  I happened to have the 10/32 t-nuts and screws required for installation, but if you don’t, most hardware stores will.

To begin, the safe and empty barreled action is removed from the stock.  The stock shown here is a McMillan A5, but the techniques used here would be applied to a wide variety of stocks.

This stock only has one QD stud on the forend (note hole where it was removed).  We will need another mounting point for the rail system.
This stock only has one QD stud on the fore-end (note hole where it was removed). We will need another mounting point for the rail system.
The rail is test fit to the stock.  Note the QD stud is used to secure the rail to the stock.  On McMillan stocks with a gel coat, you can normally see the seam where the two halves are joined.  I align this down the center of the rail adapter.
The rail is test fit to the stock. Note the QD stud is used to secure the rail to the stock. On McMillan stocks with a gel coat, you can normally see the seam where the two halves are joined. I align this down the center of the rail adapter.
Using a #8 drill I carefully drill a hole through the stock.
Using a #8 drill, I carefully drill a hole through the stock. I try to lay out my holes so a screw doesn’t pass through a rail slot.
If you go slow you won't have any chips.  Adding tape may help reduce tear out.
If you go slow you won’t have any chips. Using tape may help reduce tear out.
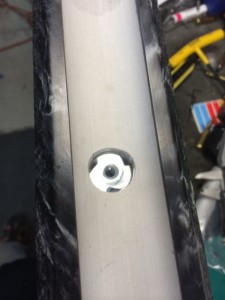
The screw that secures the rail is held in the stock by a 10/32 t-nut.  The one I am using is 3/4" in diameter.  I use a 3/4" counterbore with the same #8 drill as a pilot to counterbore hole on the inside of the stock.
The screw that secures the rail is held in the stock by a 10/32 T-nut. The one I am using is 3/4″ in diameter. I use a 3/4″ counterbore with the same #8 drill as a pilot to counterbore the hole on the inside of the stock.  The secret here is not to counterbore straight through the stock.  That would be bad.  Really bad.

While a counterbore certainly makes installation a snap, it is a specialized tool.  If you don’t have one,  a Forstner drill would work well.

The counterbore does an excellent job on the stock.
I mis some 5-minute epoxy and apply it to the counterbored hole.  This will help secure the t-nut in place.
I mix some 5-minute epoxy and apply it to the counterbored hole. This will help secure the T-nut in place.
A button head screw is used to tighten the rail to the stock.  When torque is applied to the t-nut, it is pulled down into the counterbore.  Any epoxy that seeps up is cleaned with a cotton swab,
A button head screw is used to tighten the rail to the stock. When torque is applied to the T-nut, it is pulled down into the counterbore. Any epoxy that seeps up is cleaned with a cotton swab.
Done! Once everything dries the rail is ready for a bipod.  Note the two rail mounting options.  You can either use a screw (top) or a QD stud (bottom). The flush cup hole (bottom) in the rail should be facing the back of the rifle.
Done! Once everything dries the rail is ready for a bipod. Note the two rail mounting options. You can either use a screw (top) or a QD stud (bottom). The flush cup hole (bottom) in the rail should be facing the back of the rifle.